There are many ways to install Windows®. This section describes the three supported deployment methods: from an image, from a configuration set, and from a DVD.
Every manufacturing process has advantages and disadvantages. The right choice for you and your company depends on factors such as:
- The number and type of computers that you
plan to manufacture.
- Whether your manufacturing model is
build-to-plan (BTP), build-to-order (BTO), or a combination of
these models.
- How much you customize the operating
system.
- How much you automate your deployment
processes.
- The quality checks that you perform on both
hardware components and manufactured computers.
- The existing infrastructure of your
company.
- Your company's growth rate and business
goals.
Comparison of Deployment Methods
The following table summarizes and compares the basic methods, according to the following three features.
- Speed: The time to manufacture and deliver
the computers
- Volume: The number of manufactured
computers
- Customization: The amount of automated
modifications made to the installed software
| Method | Description | Speed | Volume | Customization |
|---|---|---|---|---|
|
Installing from an image |
Deploy an image of the reference installation from a network share. You can customize the image on the factory floor if necessary. |
Fast |
High |
High |
|
Installing from a configuration set |
Start destination computers from a bootable device—for example, a floppy disk or USB flash drive (UFD)—and run Windows Setup from a network share. |
Slow |
Medium |
High |
|
Installing from a DVD |
Run Windows Setup from the destination computer by using the Windows product DVD; manually customize, audit, and reseal the installation. |
Slow |
Low |
Low |
Deployment Methods
The following section describes the general process of each method. You can modify the methods to fit your business needs.
Installing from an Image
This method gives you the most flexibility in your manufacturing environment, and enables you to duplicate multiple computers quickly. By creating a base image, you can apply it onto multiple computers with identical configuration. You can also customize the base image to meet the requirements of a specific order or a specific customer. These methods are also known as build-to-plan (BTP) or build-to-order (BTO). The BTP method is to deploy an image of the reference installation without customizing the destination computers. The BTO method is to deploy an image of the reference installation to the destination computers, which are started in audit mode and customized to order.
When adjusted for your specific manufacturing environment, this method significantly decreases the time required to manufacture each computer. For example, if you give your customers a choice from a standardized range of applications, you can stage many or all of these applications in the reference installation. In audit mode (Sysprep /Audit), install the required applications and delete the remaining applications. This method is faster than installing each required application on the factory floor. For more information about using audit mode, see Customize Windows in Audit Mode.
Each time you build a computer by using this method, you start from a known, tested reference installation. When the components change within your manufacturing environment, you need to test only those modifications on top of the known reference installation, significantly reducing the testing time required for building and testing a completely new reference installation.
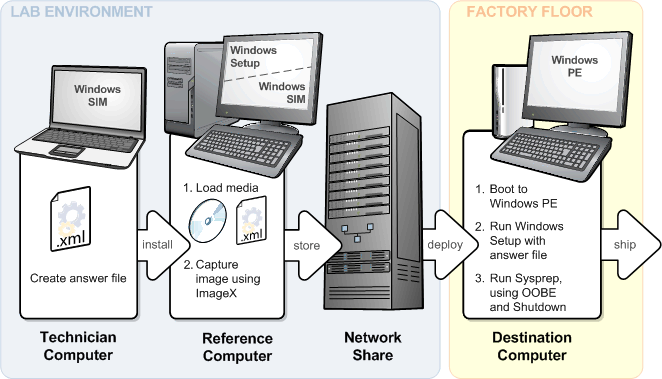
This method provides the most comprehensive automated solution. By using various implementations of Unattend.xml, you can automate all or part of the installation process. However, fully implementing an automated version of this method does require more preparation time. The following diagram depicts the process of an image-based deployment.

The basic process of this method is:
- Build a reference installation with as many customizations as
necessary, where these customizations apply across an entire
product line or all of the computers that you manufacture. As this
installation will be deployed across multiple computers, it is
important that it be thoroughly tested.
- If the installation is ready for deployment and delivery, shut
down the operating system by using the System Preparation tool
(Sysprep) and the Sysprep /Oobe /Generalize /Shutdown
command. If you plan on customizing the installation before
delivery, use the Sysprep command with the /audit
option.
- Use the ImageX tool to capture an image of the reference
installation, and then store the image on a distribution share
specified by the Windows System Image Manager (Windows SIM)
tool.
- Assemble the hardware for the destination computer.
- Start the destination computer with the Windows Preinstallation
Environment (Windows PE) tool.
- Configure the hard disk of the destination computer and
duplicate the image of the reference installation onto the hard
disk.
- (Optional) If you ran the Sysprep command with the
/Audit option, customize the installation manually or
automatically by using Unattend.xml. In this mode, you can add
additional applications and configurations. Run the Sysprep
command with the /Oobe, /Generalize, and
/Shutdown options when you are done.

|
Note: |
|
This method requires that each destination computer have an installed network adapter. |
OEMs who manufacture a large number of computers may automate all or part of this process, or build a customized version of Windows PE by using the tools provided with this kit.
You can modify this process to duplicate the reference installation onto separate hard disks, and then later place those hard disks into fully assembled computers.

|
Important: |
|
The default image file (Install.wim) included with the product DVD works only with Windows Setup (Setup.exe). Do not deploy this default image directly with ImageX. |
Installing from a Configuration Set
If you build only a small number of computers and it is not cost effective for you to build and manage images of the operating system, use the configuration set installation method. In this case, the reference computer is the destination computer.
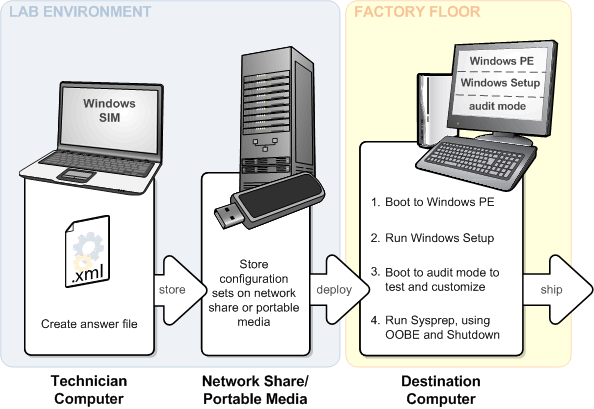
This method is flexible and easy to maintain. It requires less time to set up any required infrastructure, but it takes more time to build each computer. The following diagram depicts the process of a configuration set deployment.

The basic process of this method is:
- Use Windows SIM to create a configuration set on a network
share.
- Assemble the hardware for the destination computer.
- Start the destination computer by using Windows PE.
- Connect to the network and install the Windows operating system
from the configuration set.
- To test or customize Windows, run the Sysprep command
with the /Audit option. Make your customizations in audit
mode.
- Run the Sysprep command with the /Oobe and
/Shutdown options, and then deliver the computer to the
customer.
Installing from a DVD
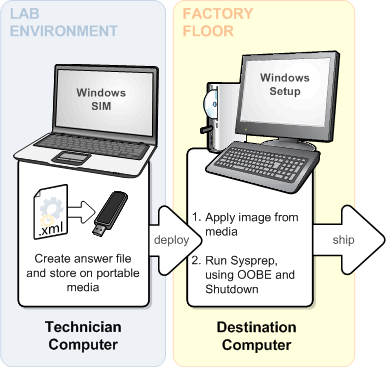
If you do not use a network or images in your manufacturing process, use the DVD-boot method. The DVD-boot method is completely manual, so it is slower. However, for low-volume businesses this method enables a high degree of manual customization. Installing from a DVD is also used to build a reference installation in image-based deployments. The following diagram depicts the process of a DVD-boot deployment.

The basic process of this method is:
- Create an answer file by using Windows SIM, and store the
answer file onto a removable media device; for example, a floppy
disk or a USB flash drive (UFD). The answer file must be named
Autounattend.xml.
- Insert removable media and the Windows product DVD into the
computer.
- Start the computer.
Windows Setup applies the settings specified in the answer file.
- When Windows Setup is finished, you can make additional
customizations and run tests.
- Run the sysprep command with the /Oobe,
/Generalize, and /Shutdown options, and then deliver
the computer to the customer.