


Extend can be used to modify existing partitions.
You can use Extend on BIOS/MBR-based systems to:
- Specify a new or existing logical partition
to fill the remainder of an extended partition.
- Specify a partition within an existing
partition structure to fill the remainder of the disk.
 Note Note |
|---|
UEFI/GPT-based disks do not support the Extend
setting. |
Values
|
true |
Specifies that the selected partition is extended to fill the remainder of the disk. |
|
false |
Specifies that the selected partition is not extended to fill the remainder of the disk. This is the default value. |
- To use extended and logical
partitions
To create a logical partition that uses the remainder of the extended partition through Windows Setup, create a partition that has an initial fixed size. For example:CreatePartition:Size=100. Then, modify the partition by settingModifyPartition:Extend=true.Do not set bothCreatePartition:ExtendandModifyPartition:Extendto true. For more information, see How to Configure More Than Four Partitions on a BIOS-Based Hard Disk.
- To modify a partition within an existing
partition structure to extend to the remainder of the disk
SetModifyPartitions:Extendtotrue.
- To specify a newly-created partition to
fill the remainder of the hard disk
SetCreatePartitions:Extend totrue, and leaveModifyPartitions:Extendempty.
Valid Configuration Passes
windowsPE
Parent Hierarchy
Microsoft-Windows-Setup | DiskConfiguration | Disk | ModifyPartitions | ModifyPartition | Extend
Applies To
For a list of the Windows editions and architectures that this component supports, see Microsoft-Windows-Setup.
XML Example
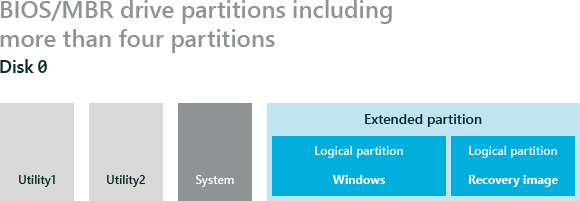
Specify a Logical Partition to Fill the Remainder of an Extended Partition
The following XML output for the
DiskConfiguration setting shows partition
modifications for a BIOS-based computer with two logical
partitions. This XML example includes the creation of an extended
partition that is set to extend to the end of the hard disk. The
second logical partition, labeled Logical2, is set to extend
to the end of the extended partition. The following illustration
shows these partitions.
 Copy Code Copy Code |
|
|---|---|
<DiskConfiguration> <Disk wcm:action="add"> <DiskID>0</DiskID> <WillWipeDisk>true</WillWipeDisk> <CreatePartitions> <!-- Recovery Tools partition --> <CreatePartition wcm:action="add"> <Order>1</Order> <Type>Primary</Type> <Size>3000</Size> </CreatePartition> <!-- Utility2 partition --> <CreatePartition wcm:action="add"> <Order>2</Order> <Type>Primary</Type> <Size>250</Size> </CreatePartition> <!-- System partition --> <CreatePartition wcm:action="add"> <Order>3</Order> <Type>Primary</Type> <Size>100</Size> </CreatePartition> <!-- Extended partition --> <CreatePartition wcm:action="add"> <Order>4</Order> <Type>Extended</Type> <Extend>true</Extend> </CreatePartition> <!-- Windows partition --> <CreatePartition wcm:action="add"> <Order>5</Order> <Type>Logical</Type> <Size>15000</Size> </CreatePartition> <!-- Recovery image partition --> <CreatePartition wcm:action="add"> <Order>6</Order> <Type>Logical2</Type> <Size>100</Size> <!-- Note: To create a logical partition that fills the rest of the extended partition, create the data partition with an initial size of 100. This will be changed in the ModifyPartition section. --> </CreatePartition> </CreatePartitions> <ModifyPartitions> <!—Recovery Tools partition --> <ModifyPartition wcm:action="add"> <Order>1</Order> <PartitionID>1</PartitionID> <Label>Recovery</Label> <Letter>R</Letter> <Format>NTFS</Format> <TypeID>0x27</TypeID> </ModifyPartition> <!-- Utility partition --> <ModifyPartition wcm:action="add"> <Order>2</Order> <PartitionID>2</PartitionID> <Label>Utility</Label> <Letter>U</Letter> <Format>NTFS</Format> <TypeID>0x27</TypeID> </ModifyPartition> <!-- System partition --> <ModifyPartition wcm:action="add"> <Order>3</Order> <PartitionID>3</PartitionID> <Label>System</Label> <Letter>S</Letter> <Format>NTFS</Format> <Active>true</Active> </ModifyPartition> <!-- Extended partition: This partition does not need a partition number, nor does it need to be modified. --> <!-- Windows partition --> <ModifyPartition wcm:action="add"> <Order>4</Order> <PartitionID>4</PartitionID> <Label>Windows</Label> <Letter>C</Letter> <Format>NTFS</Format> </ModifyPartition> <!-- Recovery image partition --> <ModifyPartition wcm:action="add"> <Order>5</Order> <PartitionID>5</PartitionID> <Label>Data</Label> <Letter>D</Letter> <Format>NTFS</Format> <Extend>true</Extend> <!-- Note: When modifying a logical partition, setting "ModifyPartition|Extend=true" sets the partition to fill the remainder of the extended partition. This overrides the "CreatePartition|Size" value. --> </ModifyPartition> </ModifyPartitions> </Disk> <WillShowUI>OnError</WillShowUI> </DiskConfiguration> <ImageInstall> <OSImage> <InstallTo> <DiskID>0</DiskID> <PartitionID>4</PartitionID> </InstallTo> </OSImage> </ImageInstall> |
|
For more information, see How to Configure More Than Four Partitions on a BIOS-Based Hard Disk.
Specifying an Existing Partition to Fill the Remainder of the Hard Drive
The following XML output for the
DiskConfiguration setting shows how to modify an
existing hard drive partition structure. In this example, the third
partition is extended to fill the remainder of the drive.
| Copy Code |
|
|---|---|
<DiskConfiguration> <WillShowUI>OnError</WillShowUI> <Disk> <DiskID>0</DiskID> <WillWipeDisk>false</WillWipeDisk> <ModifyPartitions> <!-- Modify the existing Windows partition --> <ModifyPartition> <Order>1</Order> <PartitionID>3</PartitionID> <Format>NTFS</Format> <Extend>true</Extend> <Label>Windows</Label> <Letter>C</Letter> </ModifyPartition> </ModifyPartitions> </Disk> </DiskConfiguration> |
|