The SMS Installer addresses the need for a utility to create executable software installation routines that require little or no user intervention. This tool is part of SMS 2.0, but must be installed after the installation of SMS 2.0 is complete.
The SMS Installer creates executable installation files that reproduce the exact files and settings that are created when an application is installed. These installation files are then run on client computers to install software unattended, and to provide an effective way to maintain application, operating system, and configuration consistency in the network. The following paragraphs describe the primary features of the SMS Installer application.
One or more existing application installations or the entire configuration of a client computer can be packaged into a single self-extracting file. This file can be distributed by SMS or through other distribution mechanisms like e-mail. However, using SMS also provides installation status information that other deployment mechanisms do not.
The SMS Installer program can automatically detect and use local client configuration settings. Built-in intelligence also ensures that only required files are deployed on each client computer.
When updating or repairing a previously installed program, only file changes, rather than all source files in a program, can be repackaged. This feature reduces the size of the package, since only the actual file changes are incorporated into the installation.
Each SMS Installer installation file can be digitally signed and password protected to confirm the legitimacy of its origin before client computer installation proceeds.
SMS Installer generated installation scripts can be thoroughly tested before being distributed using the 'Test' option. Installation programs can be run directly from the SMS Installer using the 'Run' option.
After distribution, if the package needs to be recalled, client computers can be restored to their state they were in prior to installation of the distributed software.
If the SMS Installer option is selected during the installation of SMS, the SMS Installer source file is placed on the site server in the \smsdir\SMS_INST\platform directories. There is a version of the SMS Installer source file for the Intel (x86-based) platform and one for the Alpha platform. Both files contain identical versions of the SMS Installer, but the Intel version is designed to run on x86-based computers, and the other is designed to run on Alpha computers.
Only the source files for the SMS Installer program are installed on the site server. Once the source files have been created, SMS Installer can be installed on any Microsoft Windows platform. SMS Installer requires about 5 MB of hard disk space.
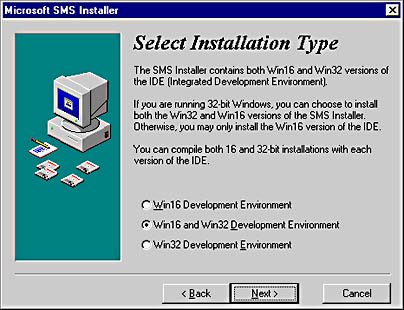
Ideally, the computer where the SMS Installer is installed and installation scripts are built should be identical in application and operating system configuration settings to client computers where automated installation routines will be run. The computer on which installation scripts are built is called the reference computer. The more the reference computer resembles the client computer, the higher the success rate will be of SMS Installer-based application installations. One of the first steps in configuring the SMS Installer is choosing the platform support requirements as shown in Figure 4-14.
Figure 4-14. Selecting the appropriate installer or installers during installation.
The 16-bit SMS Installer (SMSINSTL.EXE) and the 32-bit SMS Installer (SMSINS32.EXE) run on computers running Windows 32-bit operating systems. The 16-bit SMS Installer runs on Windows 3.1 or WFW. On Windows 32-bit computers, the installer supports long file names, the full Win32 registry, and the creation of shortcuts. When installation programs are created with the SMS Installer, both installer types generate executables that run on 16-bit and 32-bit Windows platforms.
The installation file is a self-extracting, executable file that installs applications.
The SMS Installer compares directories before and after an installation to determine which files should be copied to a client computer. It also compares the changes made to the registry and produces a script file to complete the installation.
The script file contains the chosen settings and installation options for the application to be installed. A script file can be created for an unattended installation with all options and dialog box requests answered by the script, or some responses can be left for the user to provide. All client computers that use an unattended script file will have the application installed in an identical manner.
After the SMS Installer is installed on the computer that will be used for creating installation routines, it can be started from the Microsoft SMS Installer program group. When the SMS Installer starts for the first time, it shows the Installation Expert dialog box by default (Figure 4-15).
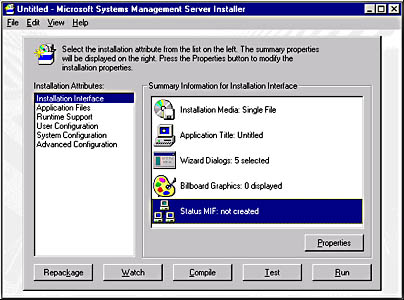
Figure 4-15. The SMS Installer Application showing the Installation Expert window.
There are three methods for creating or modifying an installation file:
Use the repackage function to produce a base script file. From there, modify the file using either the Installation Expert or the Script Editor.
When the SMS Installer is started for the first time, it will display the Installation Expert, which is used to start the Repackage Wizard and all of the Installation Expert functions.
To package a simple installation, it may be easier to use the Installation Expert to enter application files and installation settings manually rather than run the Repackage Wizard.
Use the View menu to move between the Installation Expert and the Script Editor. The Script Editor can be used to create task-oriented scripts and modify existing scripts.
The repackage function automates the creation of an installation file in the SMS Installer. The first dialog box that appears when starting the Repackage Wizard is the Repackage Installation dialog box as shown in Figure 4-16.
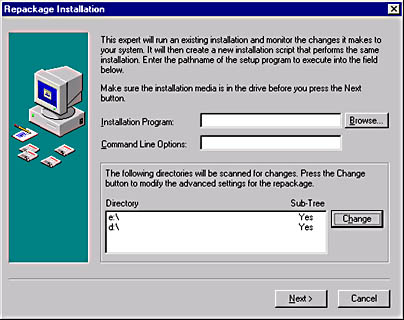
Figure 4-16. The Repackage Installation dialog box.
The Repackage Installation dialog box is used to specify the path to the application's installation program, along with any required command line options such as native application automation procedures.
By default, the SMS Installer searches the boot partition drive and its directories for file changes, but can be instructed to monitor other drives and directories during the repackage process. In the example illustrated in Figure 4-16, only the D: and E: partitions will be scanned. E: will be selected as the installation directory, while the D: directory is where the Windows NT boot partition (operating system files) are located. Modifying the partitions and directories to scan is accomplished by clicking the Change button in the Repackage Installation dialog box. In the Repackage Advanced Settings dialog box, drives and directories are configured under 'Directories to Scan.'
During the installation of the application, which is completed during the repackage process, it is possible that some temporary files may be modified. The temporary files are probably not needed for the installation to be successful, but may simply be a residual effect of the installation. SMS Installer can be configured to ignore these files during the scanning process. Then, if a temporary file changes during the installation, it will not be counted as a modified file and will not be included in the installation script. Files to ignore are specified from the Files/Directories tab in the Repackage Advanced Settings dialog box. It is not necessary to ignore page files (PAGEFILE.SYS), as the SMS Installer automatically ignores them.
It is also possible to ignore registry keys during the scanning phase. A registry key unrelated to the application installation may be updated during the repackage process. Registry keys to ignore are specified from the Registry Keys tab in the Repackage Advanced Settings dialog box. Under My Computer, select the registry keys that should be ignored, then click Add. The repackage process automatically ignores hardware keys that are likely to change.
Once the setup program is specified, the SMS Installer initiates a preliminary scan of the reference computer. When the preliminary scan is complete, then the SMS Installer launches the application setup routine. The application setup program runs and the SMS Installer stops until the application is installed. The application should be installed as required for the client computer. Once setup is complete, other setup programs can be run using the Run Setup button in the Repackage Installation dialog box. Any setup routine initiated in this manner will become part of the SMS Installer application installation routine.
The SMS Installer supports applications that must reboot when their installation is complete. When a reboot is required by an application, allow the application to reboot the reference computer. Run the SMS Installer after reboot and select the Repackage button to allow the scanning process to continue.
After the installation of the application, another scan of the configured drives and directories, as well as the registry, is performed by clicking Next in the Repackage Installation dialog box. An installation script is then produced that references all files copied, icons created, program group or Start menu items created, and registry entries modified. When scanning completes, the Repackage Installation dialog box shows a status of Completed for all actions.
The installation script created by the repackage process can be modified if necessary.
Some settings made during the automated process may not suit a specific application installation. For example, option dialog boxes may be displayed on the client computer during the setup procedure that should be suppressed or automatically answered by the installation routine. It is possible to perform an unattended, or silent, installation by running the installation file executable with the /s command line option. However, this suppresses all screen output from the installation file, so the user may not be aware that anything is happening.
It is helpful to create an SMS Status MIF file after the application has been installed. This MIF file can be added to the site database to record the status of the installation. The status MIF file is specified from the Status MIF entry of the Installation Interface installation attribute. See Figure 4-15 to locate the Status MIF entry. A status MIF can also be specified by directly modifying the installation scripts.
There are two methods for making modifications to the script file, by using the Script Editor or the Installation Expert.
Change to the Script Editor view and modify the script commands directly.
Modification of the script is accomplished using the appropriate installation attributes in the Installation Expert. If a script is open or has just been generated by the repackage process, the attributes will be displayed in the Installation Expert dialog box.
The Script Editor allows that installation scripts be created or modified manually. Actions are written to the script file that must be completed for proper application setup.
SMS Installer scripts are viewed and modified line by line using the Script Editor. If an SMS Installer script file compile fails, the Script Editor automatically starts and highlights the line that caused the compile failure. From the Script Editor, the incorrect line can be modified so the compile process continues.
The Script Editor can also be started from the View menu in the main SMS Installer application interface.
The Installation Expert (Figure 4-15) is the primary configuration window in the SMS Installer. As changes are made in the Installation Expert, they are reflected in the script being created. There are six attributes relating to the installation script modified through the Installation Expert. Figure 4-17 shows the six attributes as they appear in the Installation Expert dialog box.
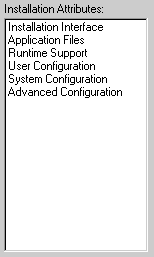
Figure 4-17. The Installation Attributes section of the Installation Expert window.
These six attributes are described in the following table.
| Installation attribute | To be used for (installation functions) |
|---|---|
| Installation Interface | Creating installation media, the user interface presented during installation, and SMS Status MIF file creation. |
| Application Files | Designating which files and components are to be installed. |
| Runtime Support | Designating which runtime files are required: Microsoft Visual Basic, Microsoft Visual FoxPro, uninstall support, ODBC drivers, OLE2 support, and VSHARE.386 support. |
| User Configuration | Assigning icons, file associations, and INI file and registry updates. |
| System Configuration | Designating any Windows NT/2000 services to be installed, as well as AUTOEXEC.BAT or CONFIG.SYS file changes required. |
| Advanced Configuration | Configuring global settings, installation screen settings, default fonts, localization support, patching, code signing and other advanced settings. |
Most of these functions configure automatically by using the repackage function. They may also be configured manually by changing the individual functions contained in each attribute.
Each installation attribute contains a set of functions used to build or modify an existing installation script. When one function provided by the attribute is accessed, all other functions can be accessed via a tabbed interface, as shown in Figure 4-18.
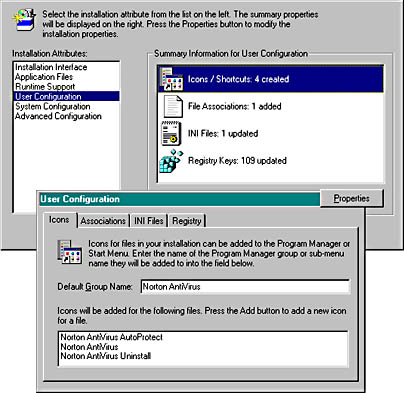
Figure 4-18. Navigating the Installation Expert window.
The Installation Interface attribute (Figure 4-19), shown in the default screen of the Installation Expert, includes the functions described in the table below. All functions can be edited manually.
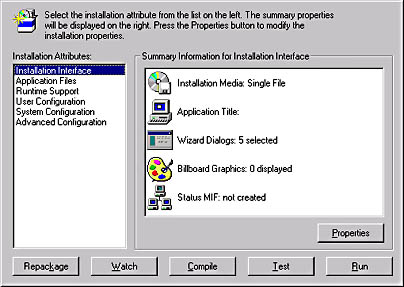
Figure 4-19. The functions of the Installation Interface attribute.
| Function | Description |
|---|---|
| Installation Media | Specifies whether the installation file created will be a single program file (for LAN, Web, BBS, or SMS distribution) or multiple files for a floppy-based installation. |
| Application Title* | Specifies the default Program Group, menu option, or shortcut name and default directory for the client application installation. |
| Wizard Dialogs* | Configures dialog boxes to be displayed during the execution of the installation file. By default, the following dialog boxes are presented to the user: Welcome, Destination Directory, Select Icon Group Name, Start Installation, and Finish. |
| Billboard Graphics | Allows custom graphics, such as company logos, to be displayed during the installation file execution. |
| Status MIF* | Allows the creation of SMS status MIF files for installation and deinstallation. In addition, this is where SMS PDFs are created. |
* It is common for the Application Title, Wizard Dialogs, and Status MIF items to be viewed or modified after a repackage operation has been completed.
The Application Files (Figure 4-20) attribute configures the files needed for the installation.
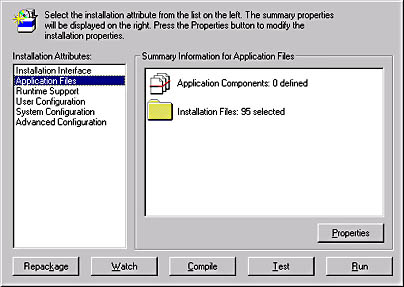
Figure 4-20. The functions of the Application Files attribute.
The Application Files attribute includes the functions described in the following table.
| Function | Description |
|---|---|
| Application Components | Allows the specification of various features that should be included with the installation. For example, a Typical installation usually contains more components than a laptop installation. This allows the user to select the components to install. |
| Installation Files | Specifies which files and directories are
installed during the installation file execution at the client.
Additional support files or custom files that need to be installed along with the application installation are included through this function. For example, a company template can be added to the application through the Installation Files function. |
The Runtime Support attribute (Figure 4-21) specifies additional components that may be needed for Visual Basic, Visual FoxPro, or database applications.
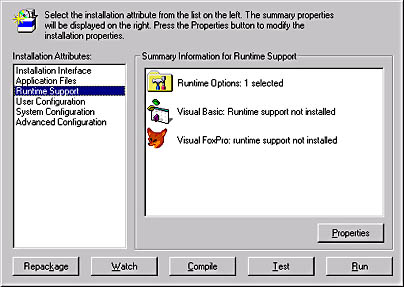
Figure 4-21. The functions of the Runtime Support attribute.
The Runtime Support attribute includes the functions described in the following table.
| Function | Description |
|---|---|
| Runtime Options | Allows the addition of special support files
needed for the installation, such as Open Database Connectivity
(ODBC) drivers, OLE, and Windows 16-bit share functions. This also
allows the addition of Uninstall support, which is enabled by
default, to uninstall an application.
Uninstall support in the SMS Installer adds an uninstall item to the Add/Remove Programs application in Control Panel. The SMS 2.0 advertised programs function works with this uninstall support to initiate an automatic uninstall when an advertisement is deleted. |
| Visual Basic and Visual FoxPro | Allows the configuration of Visual Basic support and Visual FoxPro support, including installation directory and optional file support. This is particularly helpful if packaging a custom Visual Basic or Visual FoxPro application is required. |
The User Configuration attribute (Figure 4-22) includes any icons, files associations, and *.INI files needed, along with changes to the registry.
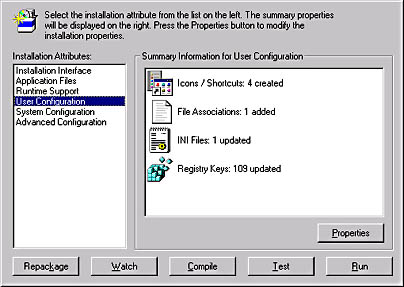
Figure 4-22. The functions of the User Configuration attribute.
The User Configuration attribute includes the functions described in the following table.
| Function | Description |
|---|---|
| Icons / Shortcuts | Allows the configuration of icons, shortcuts, and program group or Start menu option creation. Adding or removing default icons to the groups or menu allows further customization of the installation script. |
| File Associations | Specifies the file associations that should be registered as part of the script. |
| INI Files | Specifies the *.INI files that require modification due to the installation of the application. |
| Registry Keys | Allows configuration of registry keys and values that should be implemented during the installation. |
Most of these options should not require modification after the repackage function, but will require updating if the installation script is manually created.
Creating or modifying a registry setting as part of the installation is not uncommon. To create or modify a registry setting, access registry keys and expand to the appropriate key. Edit the setting as necessary, and it will be saved as part of the installation.
NOTE
A reboot occurring before the directory is re-scanned by the SMS Installer may include SMS files like the Windows 16-bit SMSCFG.INI or Windows 32-bit SMS registry configuration settings. Files and registry settings can be updated after a client computer is restarted. The SMS files and registry settings should be excluded from the installation script.
The System Configuration attribute (Figure 4-23) specifies operating system components or changes required for the installation of the application.
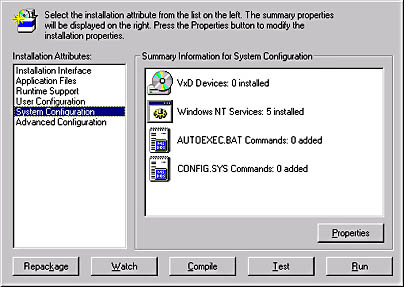
Figure 4-23. The functions of the System Configuration attribute.
The System Configuration attribute includes the functions described in the following table.
| Function | Description |
|---|---|
| VxD Devices | Allows the addition of device drivers for 16-bit Windows client computers and Windows 95/98 client computers for backward compatibility. Calls to these devices are automatically added to the [386Enh] section of SYSTEM.INI. Device drivers are specified as external to the Windows kernel (*.386 files) or internal to the kernel (as *devicename). Notice that there is no space between the * and the device name for internal kernel drivers. |
| Windows NT Services | Allows the installation and configuration of
services to be installed during the application installation. Full
service control is available through the Create Service
Settings dialog box that is presented.
The Windows NT Services function includes files, registry settings, and service controller commands required to make a service active. |
| AUTOEXEC.BAT Commands | Allows commands to be added to the client computer's AUTOEXEC.BAT file. The path statement can also be appended using this option. |
| CONFIG.SYS Commands | Allows commands to be added to the client computer's CONFIG.SYS file. |
The Advanced Configuration attribute contains more functions than fit in the Advanced Configuration box in the Installation Expert. Figure 4-24 has been modified so that all functions can be displayed and described.
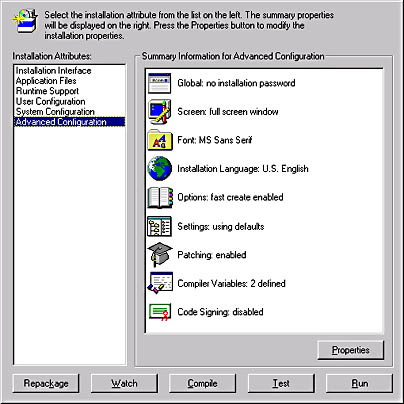
Figure 4-24. The functions of the Advanced Configuration attribute.
The Advanced Configuration attribute includes the functions described in the following table.
| Function | Description |
|---|---|
| Global | Allows configuration of options such as password protecting the installation file, designating a default INSTALL.LOG file location, and client platform support (Win16 or Win32 environment). This function also makes it possible to enable options such as maximum compression, ZIP-compatible installation files, slower installation execution, suppression of reboot messages, and so on. |
| Screen | Allows configuration of the screen variables, such as background size, color, and gradient, and the position of the progress bar on the background. |
| Font | Specifies default font size for messages and screen text. |
| Installation Language | Allows configuration of the default language for the installation file, as well as support for other languages. |
| Options | Allows configuration of options for the Script Editor, compiler, and Watch functions, such as suppression of certain error messages, display of toolbar tips, and specification of DLLs to exclude from the Watch function. |
| Settings | Allows configuration of directories to be used during the completion of the installation script, such as the Setup icon file path, the TEMP directory path, and so on. |
| Patching | Allows configuration of options for the patching facility of the SMS Installer, including whether or not it is enabled, the patch threshold, and the maximum memory to use during the patch file creation. |
| Compiler Variables | Allows the configuration, addition, or deletion of compiler variables to be used during installation, such as SYS, SMSINSTL, and so on. |
| Code Signing | If web security is a concern, the digital code signing feature can help ensure that the installation file is legitimate and has not been tampered with. |
The code signing item in the Advanced Configuration attribute (Figure 4-25) allows configuration of signing the installation file for security using credentials from a Certificate Authority and a private key.
NOTE
If code signing is enabled, the installation file can only be executed on Windows 32-bit client computers or Windows 16-bit client computers running Win32s.
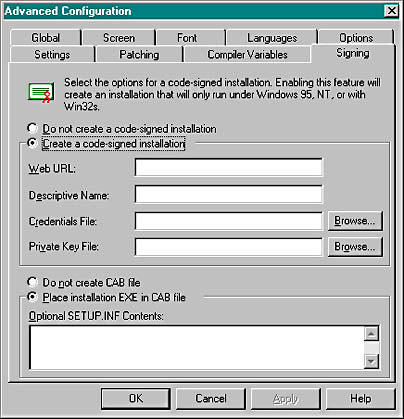
Figure 4-25. The Signing tab in the Advanced Configuration dialog box.
The following table describes the fields in the Code Signing function.
| Field | Description |
|---|---|
| Web URL | Specifies the location of the installation file on a Web site. |
| Descriptive Name | Specifies a name to be associated with the Web Uniform Resource Locator (URL). |
| Credentials File | Specifies a path and file name of the credentials file containing the certificate that users will see when they attempt to execute the installation file. |
| Private Key File | Specifies a path and file name of the private key file that is used to code-sign the installation file. |
| CAB file creation | Allows for the creation of a compressed installation file using the cabinet (CAB) file format. |
The Installation Expert dialog box (Figure 4-26) contains navigation controls for both the Repackage Wizard and the Installation Expert.
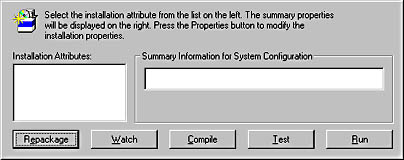
Figure 4-26. The Navigation Buttons in the Installation Expert.
The Repackage button starts the Repackage Wizard, which was discussed earlier in this lesson.
When creating custom applications, a developer may not always be aware of support files that are accessed during the application's execution, and so may fail to include them in the setup process. Unlike the Repackage function, the Watch function records the components that are used when the application runs. The Repackage function records the components that are installed during an application installation.
For example, in the case of a Visual Basic application, these support files may be called automatically by Visual Basic and its runtime components. In this case, the repackage operation will complete successfully, but the Installation Files list will be incomplete for a client that does not have Visual Basic installed. These files should be supplied with the installation file.
The Watch Button
The Watch function is initiated from the Watch button (see Figure 4-26) in the Installation Expert dialog box. A file path and application filename is supplied to run the application using all the program features during the watch function. When the installation is complete and the SMS Installer has rescanned the reference computer, the files that were accessed will be listed in the installation script, as well as under the Application Files attribute in the Installation Expert. These files can be added to the existing installation script for inclusion in the compiled installation file.
Be sure to specify the Visual Basic configuration options under the Runtime Support attribute. If there are dynamic link libraries (DLLs) that are not to be included in the Watch function report, be sure to exclude them using the Advanced Configuration attribute - Options function.
The final step in creating an installation file is to compile the script and produce a single executable file that contains the script and all files that are to be included in the application setup. This executable file can then be distributed to the client computer using the software distribution facilities in SMS or through other distribution mechanisms.
If the compile fails at any point, the SMS Installer will pause and ask whether the Script Editor should run to view the script. If the Script Editor is started, the line that causes the failure will be highlighted in the main script editor window. The script line causing the failure can be commented or deleted, and the compile run again. When the compile runs, it will continue where the failure occurred, so the successful part of the compile does not need to be repeated.
The Compile Button
The compile function is initiated from the Compile button (see Figure 4-26) in the Installation Expert dialog box. The installation script is named, and then the installation file is created. The file extensions and purpose of files using these extensions are described in the following table.
| File extension | Purpose |
|---|---|
| *.EXE | This is a compiled installation file that includes a compressed version of the installation script. |
| This is a standard version 1.0 SMS package definition file to be imported for distributing the installation file to the client computers using SMS 1.x. | |
| *.SMS | This is a standard version 2.0 SMS package definition file to be imported for distributing the installation file to the client computers using SMS 2.0. |
| *.IPF | This is installation script. |
| *.WSM | This is a working file used by the installation script. |
After the installation script has been created, either from the repackage process or manually, it should be tested. Testing the script will simulate the effects of the installation on a client computer without actually installing any files or modifying any registry settings. Testing allows you to determine what the installation will look like on the client computer and if any changes, such as the suppression of a dialog box, are necessary.
The Test Button
As the test proceeds, it will appear that files are being installed but no modifications to the system are made.
Running the installation file created in the SMS Installer executes the application installation just as it would be run on the client. If the reference computer will be used to test the installation, first remove the application that was installed during the repackage operation. The application removal should include all files, as well as all registry modifications.
The Run Button
This button installs the files and creates the required registry modifications. This procedure should be completed and the application should be fully tested after installation.
After the installation program is compiled and application testing is complete, the method of distribution must be determined. If SMS will be used to distribute the application, the executable setup routine should be written to a disk location accessible by SMS. Software installation can be completed manually using floppy disks. Disks are created for the installation file from the Media function in the Installation Interface dialog box, as shown in Figure 4-27.

Figure 4-27. The Installation Media function in the Installation Interface dialog box.
If this application is to be installed using disks, the SMS Installer can create multiple files that will fit on as many floppy disks as are necessary for the installation.
To turn this single installation executable file into a set of disks, verify that the correct floppy disk size is designated under the Media tab. Select the 'Floppy Based Installation' radio button, then designate the disk size.
Selecting the 'Floppy Based Installation' radio button and then clicking Compile creates the floppy-based installation files on the hard disk in the script directory for the SMS Installer application. The installation file prefix for the files created on the hard disk will be the same name as the script file for the installation routine.
Selecting the 'Make Floppies' option from the File menu writes the SMS Installer files to floppy disks. As a result of making this selection, the Make Installation Disks dialog box appears (Figure 4-28).
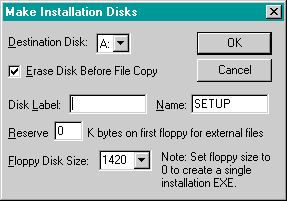
Figure 4-28. The Make Installation Disks dialog box from the Make Floppies option.
Disk 1 contains installationfile.exe, disk 2 contains installationfile.w02, disk 3 contains installationfile.w03, and so on. The installationfile prefix will be changed to the name shown in the 'Name' field in Figure 4-28.
There are occasions when a software application must be removed after it has been installed. For example, it was not configured correctly during the installation, it should not have been installed on a particular client computer, it was installed for short-term evaluation, or it does not accomplish the task it was supposed to perform.
With most commercial applications, a setup program is used to both install and remove the application. The problem with most setup programs is that they do not completely remove the application. Often they leave directories, files, and registry modifications on the client computer.
SMS Installer has both an Uninstall feature and Rollback feature that is used to remove all modifications made by an SMS Installer installation.
Rolling back an application includes uninstalling it first and then restoring files and settings. Therefore, uninstall must be enabled as the first step in using rollback support.
Before compiling the installation script, the Uninstall Support option must be selected through the Runtime Support installation attribute (Figure 4-21). As a result of enabling uninstall support, UNINSTAL.EXE will be included in the installation package during the compile process and copied to the client computer during the application installation phase. An INSTALL.LOG file will also be created in the installation directory. The uninstall routine uses this information to determine how to remove the application.
Enabling rollback support requires one change in addition to the process for Uninstall support. Before compiling the installation script, it is necessary to specify that all files that will be replaced by the installation file are to be backed up. This is done by selecting the 'Backup Replaced Files' checkbox under the Dialog tab in the Installation Interface attribute (Figure 4-17). Then, if an installation rollback is required, the uninstall routine will access the backup directory to restore any replaced files.
When the SMS Installer script is compiled and then run on the client computer, a Backup Replaced Files? dialog box appears to the user during the installation file execution. If the user does not modify the default, a directory named backup will be created below the application's destination directory. Any files replaced during installation will be copied to this location and restored during rollback.
If rollback support is required, but dialog boxes are to be suppressed for an unattended installation, then through the Script Editor find the following line:
Set Variable dobackup to B |
and change it to
Set Variable dobackup to A |
When the user runs the installation program, the installation will not pause to ask where backup files should be stored. All replaced files will be backed up to a backup directory. If a different backup directory location is required, edit the Set Variable backupdir to the desired directory location on the client computer.
To determine what must be removed from an installation, UNINSTAL.EXE reads the INSTALL.LOG file that is generated for any installation that includes uninstall support. This log file contains an entry for every file copied, and every registry entry that is created or modified. If any file, such as a *.DLL file, is replaced, and Rollback is enabled, the original file is archived to a known location. When the application is rolled back, all copied files are removed, any *.DLL or other files that have been replaced by a newer version are returned to their original version, and all registry modifications are reversed.
There are three ways to remove the application:
If this is an application installation, the uninstall information is automatically added to the Add/Remove Programs list on Windows 32-bit client computers. Simply select the application in the Add/Remove Programs Properties dialog box, then click Remove.
The Uninstall application prompts for the name of the installation log file generated by the installation package if it is not in the application directory. The default name is INSTALL.LOG. The Uninstall application then prompts for an Automated or Custom removal. If Automated is chosen, the application is completely removed. If Custom is selected, prompts appear asking which application and system files are to be removed, which directories are to be deleted, and which registry values are to be removed.
This requires that the 'Remove software when it is no longer advertised' advanced program feature is configured. Then, when the advertisement for the program is deleted, the uninstall routine will start on the client computer.
As with the package installation, it is possible to configure SMS Installer to create a status MIF file to indicate the installation status of the application. In this case, an uninstall MIF is generated to indicate the application has been removed. Configuration of the uninstall MIF file is done using the Installation Expert's Installation Interface attribute. See the section earlier in this lesson, "Installation Interface Functions," to review where this option is configured.
In this exercise, you will install the SMS Installer on the site server. The site server is used as the reference computer for the purpose of training. In a production environment, a reference computer is usually not a site server.
The Select Destination Directory dialog box appears, showing the default installation path.
The Microsoft SMS Installer window entitled Backup Replaced Files? appears, prompting you to back up any files replaced during the installation.
The Microsoft SMS Installer Installation dialog box entitled Select Backup Directory appears, prompting you for a location to back up any replaced files.
The Microsoft SMS Installer Installation dialog box entitled Select Installation Type appears, allowing you to select the appropriate development platforms.
The SMS Installer application is now installed on the primary site server.
In Exercise 25, you installed Kolumz into the C:\PROGRAM FILES\KOLUMZ directory. To run it, you had to find the KOLUMZ.EXE application in the installation directory. In this exercise, you will fully automate the installation of Kolumz and place icons under the Program Files menu. Before building the installation script, you must copy the source files from the Supplemental Training CD-ROM to a local drive on the site server.
A menu of choices appears.
The Welcome dialog box appears, displaying a tip.
NOTE
In a production installation of the SMS Installer, keep the 'Show Tips at Startup' checkbox selected to read through the helpful tips on using the SMS Installer.
The Microsoft Systems Management Server Installer window appears, displaying summary information for the Installation Interface attribute.
The Repackage Installation dialog box appears, prompting you for the path and name of the installation executable file.
The Repackage Installation dialog box appears as the reference computer (the site server for this exercise) is scanned. Eventually the Kolumz Installation dialog box titled Welcome! appears.
The Kolumz Installation dialog box titled Select Destination Directory appears.
The Kolumz Installation dialog box titled Ready to Install! appears.
The installation proceeds quickly and the Kolumz Installation dialog box titled Installation Completed! appears.
The Repackage Installation dialog box appears.
The Repackage Installation dialog box displays the rescan procedure.
The Microsoft Systems Management Server Installer window appears, displaying summary information for the Installation Interface attribute.
The Installation Interface dialog box appears showing five selected checkboxes.
| Field | Value |
|---|---|
| Install MIF name | INSTKOL.MIF |
| Uninstall MIF name | UNINKOL.MIF |
| Manufacturer | Microsoft Corporation |
| Product | Kolumz |
| Version | 0.0 |
| Serial Number | 123456 |
The Microsoft Systems Management Server Installer window appears.
A Save As window appears.
The Microsoft Systems Management Server Installer window appears.
The Kolumz installation routine runs and then quickly closes. No user input is required because all dialog boxes were disabled. As a result of the test procedure, you have decided to disable the large graphics screen that appears when the installation runs.
The Advanced Configuration dialog box appears, showing the contents of the Screen tab.
The Microsoft Systems Management Server Installer window appears.
The installation runs with a progress indicator, but with no background installation gradient.
The installation reinstalls Kolumz on the site server without a background gradient.
A menu of choices appears.
Close the Kolumz application.
Control Panel appears.
The Add/Remove Programs Properties dialog box appears.
The Kolumz Uninstall dialog box appears.
The Add/Remove Programs Properties dialog box appears.
Both the installation and uninstall routine was built using the SMS Installer.
In the previous exercise, you created the Kolumz automated installation routine with uninstall support. In this exercise, you will use the PDF created by the SMS Installer to create a package and a program for installation on Computer 2. You will also create an Advertisement to offer this package to Computer 2.
For package creation using a PDF, review Exercise 21, "Using a PDF to Create a Package and Program."
To advertise a package, review Exercise 23, "Advertising the Kolumz Package."
To run a program, review Exercise 25, "Running the Kolumz Program."