Server
Verify the new Deployment Type is available in the console
-
In the Configuration Manager console, click Software Library.
-
In the Software Library workspace, expand Application Management, and then click Applications.
-
On the Home tab, in the Create group, click Create Application.
-
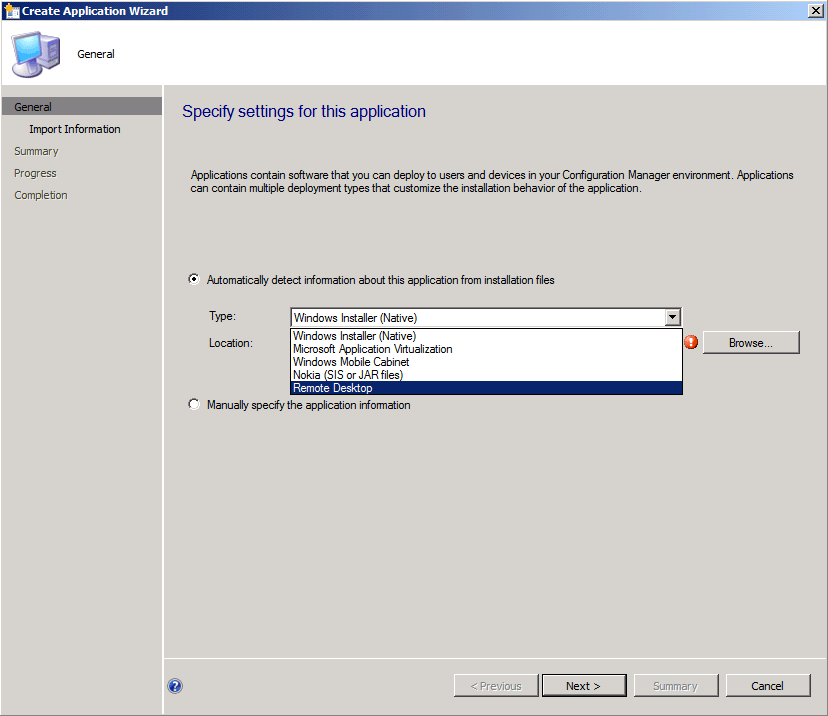
In the Type field, verify that the new deployment type is available in the pull down menu.
The image below shows an example from the RDP sample project.

 Tip Tip |
|---|
| For additional information on using the Create Application Wizard, see How to Create Applications in Configuration Manager. |
Create an application using the Create Application Wizard
-
In the Configuration Manager console, click Software Library.
-
In the Software Library workspace, expand Application Management, and then click Applications.
-
On the Home tab, in the Create group, click Create Application.
-
In the Type field, select the new deployment type from the pull down menu.
-
Continue through the wizard until successful completion.
 Tip Tip |
|---|
| For additional information on using the Create Application Wizard, see How to Create Applications in Configuration Manager. |
Create a deployment type using the Create Deployment Type Wizard
-
In the Configuration Manager console, click Software Library.
-
In the Software Library workspace, expand Application Management, and then click Applications.
-
Select an application and then, on the Home tab, in the Application group, click Create Deployment Type to create a new deployment type for this application.
-
In the Type field, select the new deployment type from the pull down menu.
-
Continue through the wizard until successful completion.
 Tip Tip |
|---|
| For additional information on using the Create Application Wizard, see How to Create Deployment Types in Configuration Manager. |
Check the Deployment Type Properties
-
In the Configuration Manager console, click Software Library.
-
In the Software Library workspace, expand Application Management, and then click Applications.
-
Select an application and then select the Deployment Type tab, in the Summary group.
-
Select a deployment type and then select the Deployment Type tab, and then click Properties in the Properties group to display the deployment type properties.
Verify the corresponding SMS_Application instance was created for the application
-
Load Windows Management Instrumentation Tester (WBEMTEST.EXE).
-
Connect to the root\sms\site_<sitecode> namespace.
-
Click Query, and then enter the below query:
 Copy Code
SELECT * FROM SMS_Application WHERE LocalizedDisplayName = '<NameofApplication>'
-
The results should appear similar to the below list:
SMS_Application.CI_ID=<Number>
Verify the digest associated with the Deployment Type contains the properties from the new technology
-
Connect to the CM_<sitecode> database.
-
Load Microsoft SQL Server Management Studio, and click New Query.
-
Enter the below SQL query:
 Copy Code
SELECT SDMPackageDigest
FROM CI_ConfigurationItems ci
JOIN CI_LocalizedProperties lp ON (lp.CI_ID = ci.CI_ID)
WHERE ci.CIType_ID = 21 AND lp.DisplayName = '<NameofApplication>'
-
The results should appear similar to the below list:
<AppMgmtDigest xmlns=”http://schemas.microsoft.com/SystemCenterConfigurationManager/…
-
Double-click the result value to view the digest.
Client
Deploy application to client using the corresponding Deployment Type
-
In the Configuration Manager console, click Software Library.
-
In the Software Library workspace, expand Application Management, and then click Applications.
-
In the Applications list, right-click the application you want to deploy and click Deploy.
-
Continue through the wizard until successful completion.
Force user and device policy to be retrieved on the client
-
On the client, in Control Panel, double-click the Configuration Manager icon, and then select the Actions tab.
-
Select Machine Policy Retrieval & Evaluation Cycle, and then click Run Now.
-
Select User Policy Retrieval & Evaluation Cycle, and then click Run Now.
Verify that synclets are distributed and compiled on the client (they will be stored in root\ccm\cimodels namespace)
-
Load Windows Management Instrumentation Tester (WBEMTEST.EXE).
-
Connect to the root\ccm\cimodels namespace.
-
Click Query, and then enter the below query:
 Copy Code
select * from ccm_handlersynclet
-
The results should appear similar to the below list:
<Technology>_Detect_Synclet.ActionType=”Detect”,AppDeliveryTypeId=”ScopeId_ …
<Technology>_Install_Synclet.ActionType=”Install” ,AppDeliveryTypeId=”ScopeId_ …
<Technology>_Uninstall_Synclet.ActionType=”Uninstall” ,AppDeliveryTypeId=”ScopeId_ …
Ensure that each action performs as expected on the client
-
Verify that the deployment action performs correctly.
 Note Note |
|---|
The deployment settings will impact validation of each action
on the client.
|


