You can use System Center 2012 Configuration Manager task sequences to capture and restore the user state data in operating system deployment scenarios where you want to retain the user state of the current operating system. For example:
- Side-by-side deployments where you want to
capture the user state from one computer to restore it on another
computer.
- Update deployments where you want to capture
and restore the user state on the same computer.
Use the following sections to manage the user state in Configuration Manager:
- User State Capture and
Restore Workflows
- Storing User
State Data
- How to
Configure the State Migration Point Role
- How to Create
a Computer Association for Side-by-Side Deployment
- How to Create a
USMT Package
- How
to Capture and Restore User State Data
- How to Restore
the User State Data when the Operating System Deployment
Fails
 User State Capture and Restore
Workflows
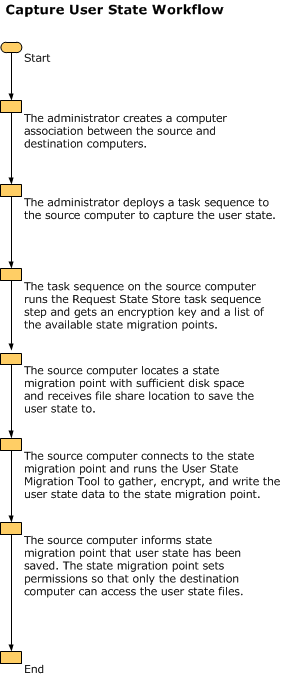
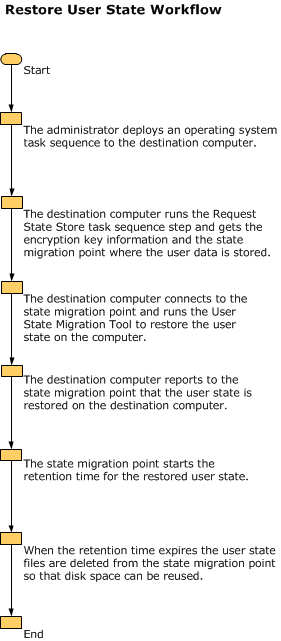
The following illustrations show the actions that are associated with the capture and restoration of user state for a computer.


 Storing User State Data
When you capture user state, you can store the user state data on the destination computer (suitable for update deployments) or on a user state migration point (required for side-by-side deployment). To store the user state on a user state migration point, you must use a Configuration Manager site system server that hosts the state migration point site system role. To store the user state on the destination computer, you must configure your task sequence to store the data locally using links.
 Note Note |
|---|
| The links that are used to store the user state locally are referred to as hard-links. Hard-links is a USMT 4.0 feature that scans the computer for user files and settings and then creates a directory of hard-links to those files. The hard-links are then used to restore the user data after the new operating system is deployed. |
 Important Important |
|---|
| You cannot use a state migration point and use hard-links to store the user state data at the same time. |
To store the user state data on a state migration point, you must perform the following steps:
- Configure a state migration point to store the user state
data.
- Create a computer association between the source computer and
the destination computer. You must create this association before
you capture the user state on the source computer.
- Add steps to your task sequence that captures the user state
data and then stores it on the state migration point.
- Add steps to your task sequence that retrieves the user state
data from the state migration point and then restores the data on
the destination computer.
To store the user state data on the destination computer for update deployments, you must perform the following steps:
- Add steps to your task sequence that capture
and store the user state data to a local folder using links.
- Add steps to your task sequence that restores
the user state using those links.
 Note
NoteThe user state data that the hard-links reference remains on the computer after the task sequence removes the old operating system. This is the data that is used to restore the user state when the new operating system is deployed.
 How to Configure the State Migration
Point Role
You can use the following methods to configure a state migration point to store the user state data:
- Use the Create Site System Server Wizard to create a new
site system server for the state migration point.
- Use the Add Site System Roles Wizard to add a state
migration point to an existing server.
When you use these wizards, you are prompted to provide the following information for the state migration point:
- The folders to store the user state data.
- The maximum number of clients that can store
data on the state migration point.
- The minimum free space for the state
migration point to store user state data.
- The deletion policy for the role. You can
specify that the user state data is deleted immediately after it is
restored on a computer, or after a specific number of days after
the user data is restored on a computer.
- Whether you want the state migration point to
respond only to requests to restore user state data. When you
enable this option, you cannot use the state migration point to
store user state data.
For more information about how to install site system roles, see the Install Site System Roles section of the Install and Configure Site System Roles for Configuration Manager topic.
 How to Create a Computer Association
for Side-by-Side Deployment
Create a computer association to define a relationship between a source computer and a destination computer for side-by-side deployments. The source computer is an existing computer that Configuration Manager manages. When you deploy the new operating system to the destination computer, the source computer contains the user state that is migrated to the destination computer.
 To create a computer association
 How to Create a USMT Package
To store the user state data locally or on a state migration point, you must create a package that contains the USMT source files that you want to use. This package is specified when you add the Capture User State step to your task sequence.
Use the following procedure to create a USMT package by using the Create Package and Program Wizard. For more information on the Create Package and Program Wizard, see the How to Create a Package and Program by using the Create Package and Program Wizard section of the How to Create Packages and Programs in Configuration Manager topic.
 To create a USMT package
-
On the Package page of the Create Package and Program Wizard, select This package contains source files and browse to the USMT folder in the WAIK folder.
Only one USMT package is required for x64 and x86 computers, so browse to the root USMT folder. Typically the path to the USMT folder is C:\Program Files\WAIK\tools\USMT.
-
On the Program Type page of the wizard, select Do not create a program.
-
Complete the wizard.
 How to Capture and Restore User
State Data
To capture and restore the user state, you must first create a task sequence, and then edit the task sequence to add the following task sequence steps:
- Request State Store: This step is needed only if you
store the user state on the state migration point.
- Capture User State: This step captures the user state
data and stores it on the state migration point or locally using
links.
- Restore User State: This step restores the user state
data on the destination computer. It can retrieve the data from a
user state migration point or from the destination computer.
- Release State Store: This step is needed only if you
store the user state on the state migration point. This step
removes this data from the state migration point.
You must use the User State Migration Tool (USMT) to complete the capture and restore steps. When you migrate user state from Windows XP to Windows XP, you must use USMT 3.0.1. For all other supported user state migration scenarios, you must use USMT 4.0.
Use the following procedures to add the task sequence steps needed to capture the user state and restore the user state. For more information about how to create a task sequence and how to edit a task sequence, see the following sections in the How to Manage Task Sequences in Configuration Manager topic:
 To add task sequence steps to capture
the user state
 To add task sequence steps to restore
the user state
 How to Restore the User State Data
when the Operating System Deployment Fails
If the operating system deployment fails, use the USMT 4.0 LoadState feature to retrieve the user states data was captured during the deployment process. This includes data that is stored on a state migration point or data that is saved locally on the destination computer. For more information on this USMT feature, see LoadState Syntax.


