|
|
|
HP has integrated and updated the Task Sequence Editor as the
following when you select one of the HP custom actions.
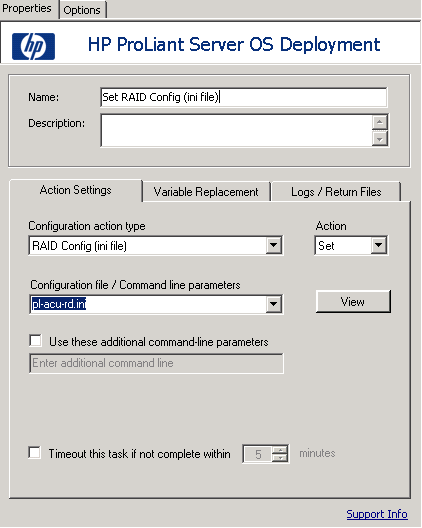
Action Settings tab
|
|
|
The HP custom settings contain the following controls.
Configuration Action Type
This list displays the available HP configuration. It represents
the types of major activities used by to configure ProLiant
servers, such as configuring the BIOS, array controller, iLO and
boot order. Details of the HP Configuration Actions are described
in HP Custom Configuration Actions.
This list displays the available options for the selection
configuration action type, which is either Get or Set, or both.
With each configuration type, you can apply a configuration to the
targeted machine ("Set") or you can capture a configuration from a
reference machine ("Get") using a single task step. Some
configuration types enable only one option, and in that instance,
only one is available to select. Once you select an available
action, additional controls become visible and/or enabled.
Configuration File/Command Line
Parameters
Based on the Configuration Action Type you are performing, the
command needed by the utility is either the name of a file or a
command line parameter. This control enables you to enter the
appropriate parameters or configuration file for the task. The
information that appears and options available follow these general
rules:
-
If a configuration is being applied ("Set") and:
-
the utility requires a configuration file, the list contains a
list of sample files included with the installation, in addition to
any other files you place in the same directory. When you select
one of the files, the View button appears to the
right of the list. When you click the button, the text editor
appears, displaying the contents of the file.
-
the utility requires a configuration file that is text or XML
formatted, the list contains two options at the top: "<Create
configuration file>" and "<Import configuration file>"
-
If "<Create configuration file>" is selected, the "Create"
button appears to the right of the list. When you click the button,
the text editor / Array Builder dialog appears with no contents,
enabling you to create a configuration file from scratch.
-
If "<Import configuration file>" is selected, the "Import"
button appears to the right of the list. When you click the button,
a file selector appears, enabling you to select a file that will be
imported into the text editor / Array Builder.
For more about using the text editor, see "Using the Text
Editor." For more about using the Array Builder, see "Using the
Array Builder."
-
The utility requires a command line, the control is appears as a
text box, enabling you to enter the appropriate command line.
-
Use These Additional Command Line
Parameters
This checkbox enables or disables the Additional Command Line
control. It is checked manually by you or can be checked (and
optionally not-modifiable) programmatically based on the
requirements of the selected configuration type. Some configuration
types might not require additional command line parameters. In this
instance, the checkbox does not appear.
This checkbox controls the use of the timeout value control. If
checked, the timeout value control is enabled and you can specify
an integer value (limit to between 5 and 100) for the timeout
value. The task is marked as failed if the status is not returned
within the timeout value.
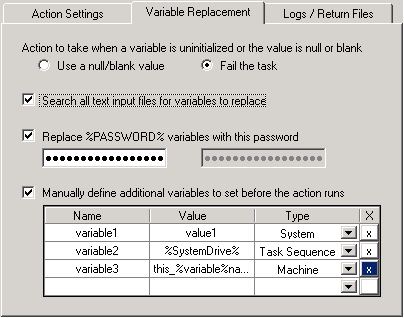
Variable Replacement
tab
|
|
|
The Variable Replacement tab contains all the settings related
to the use and replacement of variables within the task. Variables
can take several forms:
Actions to take for uninitialized and null variables include the
following.
When you need a variable that is not initialized or has a blank
value to remain blank, you must select this option. This causes the
processing of the task on the clients side to continue if any
variable is undefined or blank.
In some instances, if variables are intended to be replaced but
are not found within the environment, the action is left in an
unusable or misconfigured state. If an environment variable is not
set or is set to null, an invalid value is returned. When this
checkbox is selected, any failure to retrieve a valid variable
value results in the action being marked as failed. This feature
enables you to see what is wrong with the action rather than trying
to debug a failed command line or a misconfigured system.
Search all text input files for variables
to replace
This setting enables the client-side script to search for and
replace variables in the command line or within the files
specified. The variables are replaced with values found in the task
sequence environment or the Windows® system environment. If you do
not have any variables in the command line or in files specified,
leaving this checkbox unchecked provides for greater performance of
the action since it does not have to search for the variables in
every file.
Replace %PASSWORD% variables with this
password
In some instances, configuring a hardware component requires the
use of a password. Rather than embedding the password in plain text
within the XML or visible on the command line, you can utilize this
option to store the password hidden from you and used within the
action on the client as a task sequence variable. Checking this box
enables the two password textboxes. Two textboxes are used to
ensure you confirm the password entered since the password text
does not appear.
Manually define additional
variables
You might have to set additional variables on the system prior
to a task running. This might be because the utility or script
being run needs to have specific variables defined to direct it to
a specific path, other utilities, or to define options for program
execution. This data grid enables you to define an unlimited number
of additional variables for this task, which is set prior to the
start of the command that runs the associated utility.
Each variable must have a name, but the value can remain empty
if you need to create a null variable. Each variable can be set as
a system, task sequence, or machine variable. To remove a variable,
click the X button on the appropriate row. A
variable's value can contain another variable. This is useful in
the instance that an existing variable holds the value you need,
but the program needs to access that information from a different
variable name.
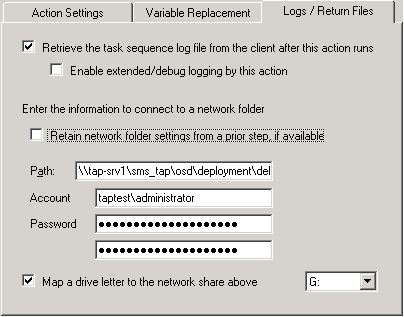
Log/Return Files tab
|
|
|
The settings on the Log/Return Files tab relate to files that
are returned to the site system after the task runs, including
either log files or captured configuration files, or both.
Retrieve the task sequence log file
When a task sequence runs, Configuration Manager tracks and logs
command execution through the SMSTS.LOG file stored in the local
path on the client (for example, on the X: drive in WinPE). This
log file contains valuable debugging information, yet when using
WinPE, the log is lost at each reboot. This checkbox enables the
SMSTS.LOG file to be sent back to a designated location specified
previously in a "Connect to Network Drive" action.
After the command executes, the client gathers the SMSTS.LOG
file and pushes it back to the mapped network location specified in
the Drive Letter list and the Path textbox. If the path does not
exist, it is created before the log file is placed there. If a
filename is specified in the path, the SMSTS.LOG file is saved as
that file. If the file already exists, the file name is modified
with an incremental value and then saved.
Enable extended/debug logging
By default, a limited amount of information regarding the task
execution by the script appears in the SMSTS.LOG file. By enabling
debug-level logging, a much greater amount of information is
included in the log file, which might assist with troubleshooting a
failure in the task sequence. This setting only affects the logging
by the custom action script and not the logging by the task
sequence client itself.
For information about logging debug information about the Admin
UI components of the custom action, see the Debugging UI Issues
section in the troubleshooting assistant.
The log path enables the log file to be stored in a location
other than the root directory of the mapped drive. If a path is
specified, the log is stored there. If the directory does not
exist, it is created if possible. If a filename is specified at the
end of the path, the log file is saved as that file name. If the
file name already exists, then an incremental value is added to the
name so the file can be saved without overwriting an existing
file.
The domain and account name to be used to access the above
path.
The password associated with the account name. The password is
stored and transmitted in encrypted form.
The map a drive checkbox enables the list for mapping a drive. A
mapped drive is not necessary to store files on a network share (a
UNC path can be used), but HP recommends mapping a drive. A mapped
drive is required for accessing any batch files (.CMD or .BAT).
The mapped drive list contains drive letters that are used to
store the log file or the captured settings file from the Get
action. This drive needs to already have been mapped using a
Connect to Network Folder action prior to this task step.
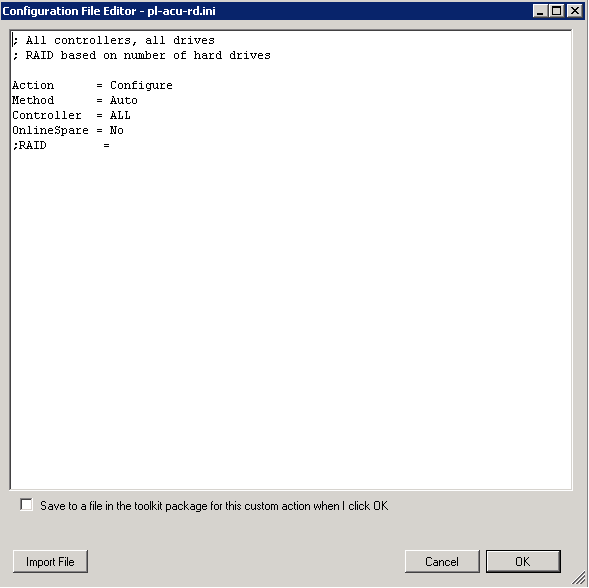
Viewing the configuration
file
|
|
|
When you click the View button, the
Configuration Text Editor screen appears.
The Import File Button menu item enables you to search for and
import an existing text-based file. The contents appear in the
form.
By selecting the Save to Package checkbox, the configuration is
exported to a file when you click OK on the page.
The starting directory is the package directory where the other
toolkit configuration files exist. The package must be updated to
distribution points before any changes are available to task
sequences.
Save to a Variable
If you do not choose to save the configuration to the package,
the configuration is saved as a string within the task sequence and
sent as a variable to the target server during deployment. When
this occurs, it is noted in the custom action with the
configuration parameter text "[Configuration saved as a variable]".
The configuration can be saved as a file in the package instead by
re-opening the editor, checking the box on the left and clicking
OK, and then selecting the file to save.
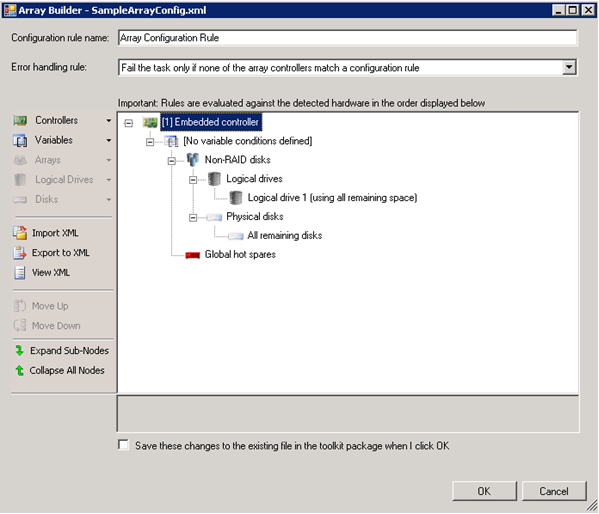
Using the Array Builder
interface
|
|
|
Array Builder is only available if RAID Config (wizard) is
selected as the Configuration Action Type. The Array Builder is a
tool that enables you to define rules for configuring array
controllers in target servers based on several variable factors.
You can configure the storage array using a rule, without having to
know the exact physical configuration of the array controller and
disks before you start your deployment.
When you run the task sequence on target server, the array
configuration utility detects the existing controllers in the
system as well as the disks attached to each controller. The custom
action then tries to match the physical configurations it detected
to the logical configurations you defined in the configuration
rules. These array configuration rules are defined using a
graphical, logical layout that enables you to visualize how your
array controllers are configured. Rules are processed in the order
they appear in the tree, so you know exactly which rules have
priority.
You can define rules to match configurations based on the
detected slot number that the controller is in (or just the
embedded controller, if any), how many disks are attached to the
controller, or apply a blanket configuration to any controller it
finds. Configuration rules can also be applied based on task
sequence variables detected on the system. This enables you to
define different configurations to servers even if the detected
hardware is identical.
If you attempt to apply a very specific set of configuration
rules to target servers, the configuration might fail when one of
the rules does not match a controller in the system. To apply a
large blanket set of rules to all servers, the configuration might
fail only when none of the rules match any controller. This setting
enables you to control these actions.
There are three available error handling rules:
-
Fail the task if any controller does not match a configuration
rule?Reports a failure on the task if any of the detected
controllers are not able to be configured by a rule.
-
Fail the task only if the first controller does not match a
configuration rule?Reports a failure if the first controller
detected (usually the embedded controller) cannot be configured by
a rule.
-
Fail the task only if none of the array controllers match a
configuration rule?Reports a failure only if all of the controllers
in the system fail to match a rule, leaving none configured.
Array Builder elements and their
associated rules
The following is the definition of the rules associated with the
different elements in the dialog. The rules define what actions can
or cannot be performed on the various elements, which in turn
drives the activation or deactivation of the various controls (menu
buttons) on the dialog or results in warnings. For example, if
moving an array upward in the list causes an invalid configuration,
the "Move Up" control is disabled or a warning dialog appears.
The wizard supports only 1 controller configuration. Controllers
can be one of the following configuration types:
When launching the Array Builder from a <Create configuration
file> selection in the deployment action, a default controller
is created. You can choose to leave the controller unconfigured
with disks set to non-RAID, or you can add arrays or do other
actions. When a controller node is selected, the Edit Controller
enables you to change the configuration of the controller.
Array nodes include both RAID arrays and non-RAID disk groups
(indicated by "Non-RAID disks" and the different array icon). By
default, a non-RAID disk group is created when a controller is
created. If the controller configuration specifies a number of
disks required, that many disks is added to the non-RAID group.
Arrays can be added, modified or deleted depending on the
controller configuration and number of disks available. Array
elements contain logical drives and physical disks.
When an array node is selected, the following controls are
enabled:
-
New Array
-
This control enables the addition of another array to the
controller under the same variable condition. Adding an array also
adds a default number of disks to meet the requirements of the
array. For example, adding a RAID 5 array adds three disks
automatically. You are not enabled to remove disks below the RAID
requirement.
-
Some arrays (RAID 1) require an even number of disks in the
array. In these instances, you cannot create a situation where an
odd number of disks exist. For example, if you add a disk to a
two-disk RAID 1 set, the program adds another disk to ensure there
is an even number. If you delete a disk, the program deletes two
disks. Status messages inform you of these actions as
appropriate.
-
This control currently supports only RAID 0, 1 and 5.
-
Edit Array
-
Arrays can be edited from one RAID type to another. For example,
you can decide to configure the controller with a RAID 5 array
instead of a RAID 1 array by changing the array type.
Changing the array results in an evaluation of disk
requirements. If the array does not contain enough disks to meet
the RAID requirement, the appropriate number of disks are added and
you are notified of the action. If the new RAID level requires
fewer disks, no disks will be removed.
-
If the controller defines an exact number of disks and you
attempt to change an array and the new array requires more disks
than the existing array, the program attempts to move disks from
the Non-RAID disks set to the new array. If there are not enough
disks in the non-RAID set, you are prevented from changing the
array.
-
If you change an array to a type that requires an even number of
disks, another disk is added or removed if necessary to meet that
requirement.
-
Changing from one array type to the same array type is disabled
on the menu.
-
Delete Array
-
You cannot delete the "Non-RAID disks" node.
-
This control deletes an array and results in the deletion of all
disks in that array, except where the controller defines an exact
number of disks. The program moves the array disks to the Non-RAID
disks set.
-
New Logical Drive
This control enables the creation of a new logical drive in
addition to the default logical drive.
-
New Disk
-
Enables addition of one or more new disks to the array. You can
add a single disk, multiple disks at once, a hot spare disk, a hot
spare assigned to the last drive on the controller, or "all
remaining disks." For the complete rules information, see the disks
section below.
-
If the controller defines an exact number of disks, the New Disk
button is disabled.
-
If the array or the controller already contains an "all
remaining disks" element, this option is disabled on the New Disk
menu.
-
Move Up /Move Down
-
If an array can be moved up or down on the controller, those
menu selections are enabled
-
Moving array controllers result in the following:
-
Array names (such as "A" and "B") are modified so that the
arrays are listed in alphabetical order.
-
Disks are renumbered so that disks are listed in order on the
controller. This also enables you to specify which disks are used
in which array by re-ordering the arrays on the controller.
-
The "Non-RAID Disks" node is always listed last.
Logical drives or virtual disks
Logical drives are contains arrays or non-RAID disks node that
are configured to a specific size (in GB) and consumes all
available and remaining space in the array. By default, a single
logical drive is created for all new arrays, and set to consume all
available space. When specific-size logical drives are defined, the
"using all remaining space" logical drive consumes any leftover
space after the other logical drives have allocated their space on
the array.
When a logical drive node is selected, the following controls
are enabled:
-
New Logical Drive
When you create a new logical drive, it is placed before the
default "using all remaining space" logical drive if one
exists.
-
Edit Logical Drive
-
You can modify the settings of the currently-selected logical
drive, including changing the allocated size, or change it from
maximum size to a specified size, or vice versa.
-
If a logical drive using all remaining space already exists, you
cannot change another logical drive to that type.
-
Delete Logical Drive
-
This control removes the selected logical drive.
-
You cannot remove the last remaining logical drive.
-
Move Up /Move Down
-
If a logical drive can be moved up or down on the controller,
these menu selections are enabled
-
Moving logical drives cause logical drive numbers to be modified
so that the logical drives are listed in numerical order.
-
The "using all remaining space" node is always listed last.
Physical disks or array disks
Disks are arrays or non-RAID disks node and take several
forms:
-
Standard disks - These disks are basic and non-defined disks
that make up the storage on arrays.
-
All Remaining Disks - When you want to define an array without
specifying exactly how many disks are in it, you use this form. For
example, when you want a RAID 1 set as the first two disks, and the
rest (an unknown number between 1 and 6) can be utilized in the
best manner possible. In this instance, you must define the RAID 1
array, and then create a dynamic array containing the "All
Remaining Disks" element.
If the controller configuration specifies a number of disks
required, that many disks is added to the non-RAID group. If the
controller specifies an exact quantity, disks cannot be added or
removed from the controller. They can only be moved from array to
array (or the non-RAID group). If the controller specifies a
minimum number of disks, disks can be added and removed, but you
cannot remove disks beyond the lower limit of the controller
configuration.
When a disk node is selected, the following controls are
enabled:
-
New Disk
-
You can add as many new disks as you need to any configuration
except where an exact number of disks is specified. In that
instance, the "New Disk" menu item is disabled.
-
If an "all remaining disks" element exists in the array or on
the controller, that menu selection is disabled.
-
Delete Disk
If deleting a disk invalidates an array or a controller
configuration, a warning dialog appears and the deletion is
disallowed. If you are deleting an "all remaining disks" node, and
there are not enough disks left in the array, you must add disks
before they can delete the "all remaining disks" node.
-
Move Up /Move Down
This control is only applicable if you are moving the hot spare
disks among the standard disks.
Import XML
This menu item enables you to search for and import an existing
Array Builder XML file. The XML file must be properly
formatted.
Export to XML
This menu item enables you to save the current configuration to
an XML file in any location you wish. This configuration file is
used and saved into the package, unless you choose to save to a
variable instead (see below). This selection is also enabled if you
create a new configuration or when you make a change to an imported
configuration.
View XML
This menu item enables you to view the current array
configuration rules in XML form as they are sent to the server
being configured.
Save to Package
By selecting this checkbox, the configuration is exported to a
file when you click OK on the page. This is menu
item is similar to the export feature, except that the starting
directory is the package directory where the other toolkit
configuration files exist. This enables you to create new
configurations that can then be propagated to the rest of the
company.
Save to a Variable
If you do not choose to save the configuration to the package,
the configuration is saved as an XML string within the task
sequence and sent as a variable to the client during deployment.
When this occurs, it is noted in the task UI with the configuration
parameter text "[Configuration saved as a variable]". The
configuration can be saved as a file in the package instead by
opening the Array Builder again, checking the box on the left and
clicking OK, then selecting the file to save
to.
|
|
|
|